In July 2025, the Old World Matched Play Guide was officially released and we covered the book in general.
Now we’re going into detail on 6 new the old world scenarios, explaining how each one works, what kind of deployment is used, and which missions or secondary objectives Games Workshop recommends in each case.
Important: GW repeats a lot of information across the book, so I’m condensing and simplifying everything so this post works as a quick reference. You can check anything mid-game here—because digging through the book as it stands is a real chore, especially if you have to integrate all of this with Warhammer Old World FAQ 1.5
For all maps: the player who wins the roll chooses a deployment zone and starts deploying. They cannot choose to let their opponent deploy first.
Let’s break down each scenario.
Scenario Old World 1: Upon the Field of Glory
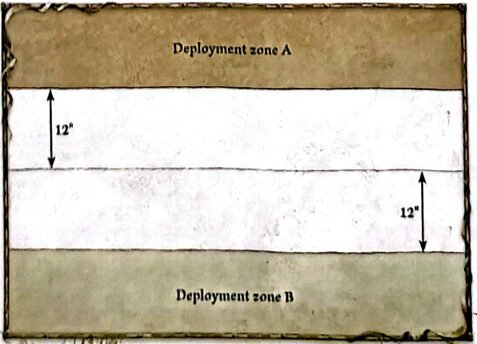
This is your classic pitched battle, where you deploy along your entire long board edge, with a minimum of 24 inches from the enemy (i.e., 12″ from the center line).
It’s a solid pick for the last round of a tournament, when players are tired, drunk, napping—or some mix of the above.
- Recommended duration: Fixed, variable, or break point.
- Deployment type: Classic, 12″ from the center.
- Suggested secondary objectives: Any.
- Notes: No special rules. Ideal for the last tournament round.
Scenario Old World 2: King of the Hill
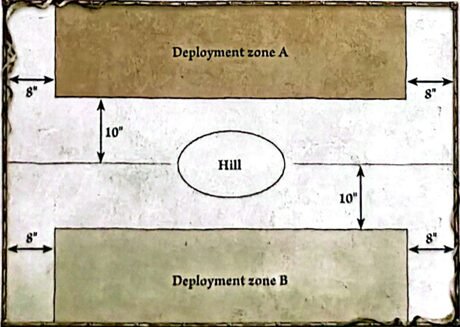
A single large hill in the center, up to 12×18 inches max (though I imagine we’ll often play it smaller—12×18 is massive for a line-of-sight blocker. Grab a tape measure and see for yourself).
Normally objectives are controlled within 6″, but this hill is the exception: it can be controlled from 9″ FROM THE CENTER of the hill (and therefore the table). So with that size, you basically need to be on the hill to control it.
- Recommended duration: Random or break point.
- Deployment type: Long board edge, centered 8″ from flanks, 20″ between players.
- GW-suggested secondary objectives: Supply Trains, Special Element (impassable terrain in the center—yes, on top of the hill. Madness.).
- Additional rules: No Vanguard Moves allowed.
- Who can control the hill? Only Core units with Unit Strength 10+, not fleeing and not suffering from Stupidity.
- Scoring: At the end of each player’s turn, the one closest to the hill’s center gains 100 victory points.
Scenario Old World 3: Drawn Battlelines
This scenario includes a twist: roll two dice. If either die shows a 1 (33% chance), both players select one of their infantry or cavalry units to be placed in reserve.
If that happens, players may attach characters to the unit, and they’ll go into reserve as well.
Reserved units enter the battlefield automatically from turn 2, via the controlling player’s deployment zone (long edge and half of a short edge).
Note: In this scenario more than any other, it’s worth having a unit with Ambush to combo with the reserve rule—just in case that 1 comes up.
- Recommended duration: Do not use break point.
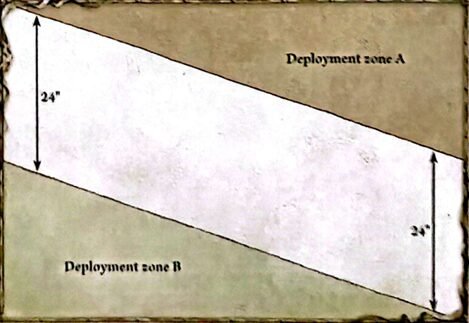
- Deployment type: Diagonal, from one short board edge to the opposite corner.
- Secondary objectives: 3 Objectives (mandatory), with optional Domination (quadrant control) and/or Supply Trains.
- Notes: Great for Ambush combos.
Scenario Old World 4: Close Quarters
The short edges of the board are impassable terrain. That means no fleeing or entering from those sides.
At a glance, this rule probably won’t change how most people approach the game or their strategies (but hey, no ambushers coming in from the flanks—so while they gained power in the last scenario, here they lose it a bit).
- Recommended duration: Fixed turns or break point.
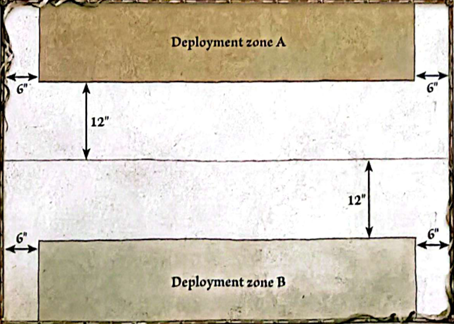
- Deployment type: Centered, 6″ from flanks and 12″ from the center (24″ between players).
- Secondary objectives: 2 Objectives (mandatory), with optional Domination.
- Notes: No flank ambushes. Slight nerf to ambusher units.
Scenario Old World 5: A Chance Encounter
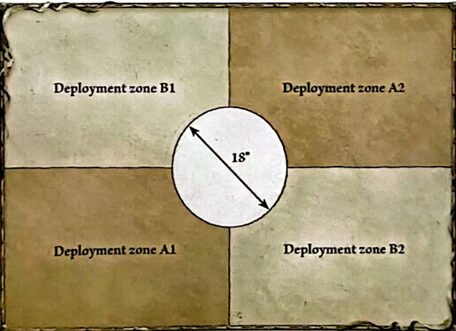
In this scenario, the player who wins the roll chooses a quadrant to deploy in. Their opponent must deploy in the diagonally opposite one.
GW also says the Special Element (a central terrain piece with random bonuses for whoever controls it) must be included. This makes the usable deployment area very tight. You can’t use the full quadrant, since you must stay at least 9″ from the board center. Add in typical terrain clutter, and space becomes a real issue.
Also, players are extremely close—turn 1 charges are on the table, especially with Swiftstride units reaching past 18″.
- Recommended duration: Random or break point.
- Deployment type: Diagonally opposite quadrants, with a no-go center area.
- Suggested secondary objectives: Special Element (mandatory), optional Domination and/or Supply Trains.
- Notes: Tight deployment zones. Center terrain matters. Early aggression very possible.
Scenario Old World 6: Encirclement
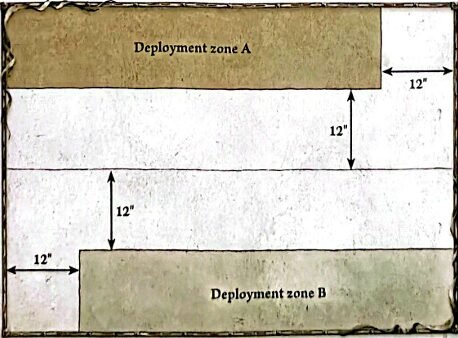
This scenario plays almost exactly like the classic pitched battle (see Scenario 1), with one key change: you cannot deploy within 12″ of your left flank. That’s it.
Now, if you add a large Impassable Terrain feature in the center as a secondary mission and neither player can use the left side, this can start to feel like a Benny Hill sketch, with both armies running circles around the central building.
- Recommended duration: Fixed or variable, but not break point.
- Deployment type: Classic, but with no deployment on the left flank.
- Suggested secondary objectives: 4 Objectives (mandatory), with optional Supply Trains and/or Special Element.
- Notes: Plays like a standard setup, but terrain and flank rules create chaos.
With this, you now have a clear and practical overview of the 6 new Warhammer the Old World scenarios. It’s worth noting that only Scenario 2 – King of the Hill awards direct victory points for board control. In the rest, scoring comes from completing secondary objectives, killing enemy units, and other bonuses— I cover EVERYTHING that gives you some points in the same post.
Remember: When you fail Stupidity Old World 1.5 you cannot take objectives, the center of the hill in scenario 2, move, reform, shoot or cast spells.
Oh! if you want to play The Old World Battle March rules and scenarios do change a little bit so you can check them following the link 🙂
Here you have the post that dive into the Warhammer Old World missions, how they interact with each deployment type, and which ones synergize best with each scenario (you will see that the metagame is going to change a lot, even 1.5 Old World Slayers may be playable now).
The Old World Missions & Victory Conditions (Matched Play Guide) – Explained

Old World Matched Play Guide Analysis
Dwarf Tier List in Warhammer The Old World: what is worth it and what is not

How to Shoot Characters in Warhammer The Old World (Complete No-Mistakes Guide)
Chaos Magic in Warhammer The Old World: Make it work
Any error in the post, feel free to reach out at theoldwarrior@theoldwarrior.com.
