
Although Chaos Dwarfs are hardly one of the armies we see most often these days, they are among the most characterful factions in Warhammer The Old World.
They never got the chance to become one of the game’s main armies. Fans have made countless attempts to bring them back to the Old World, and now we finally have something official.
Is what we have enough? For many of us, myself included, it isn’t. Games Workshop doesn’t seem likely to show them any love. They are a Legacy army, like so many others, and not exactly the strongest Legacy army either.
Even so, they have distinctive units and mechanics that give the army a lot of character. I like them a lot.
So let’s take a look at a complete Chaos Dwarf tier list.
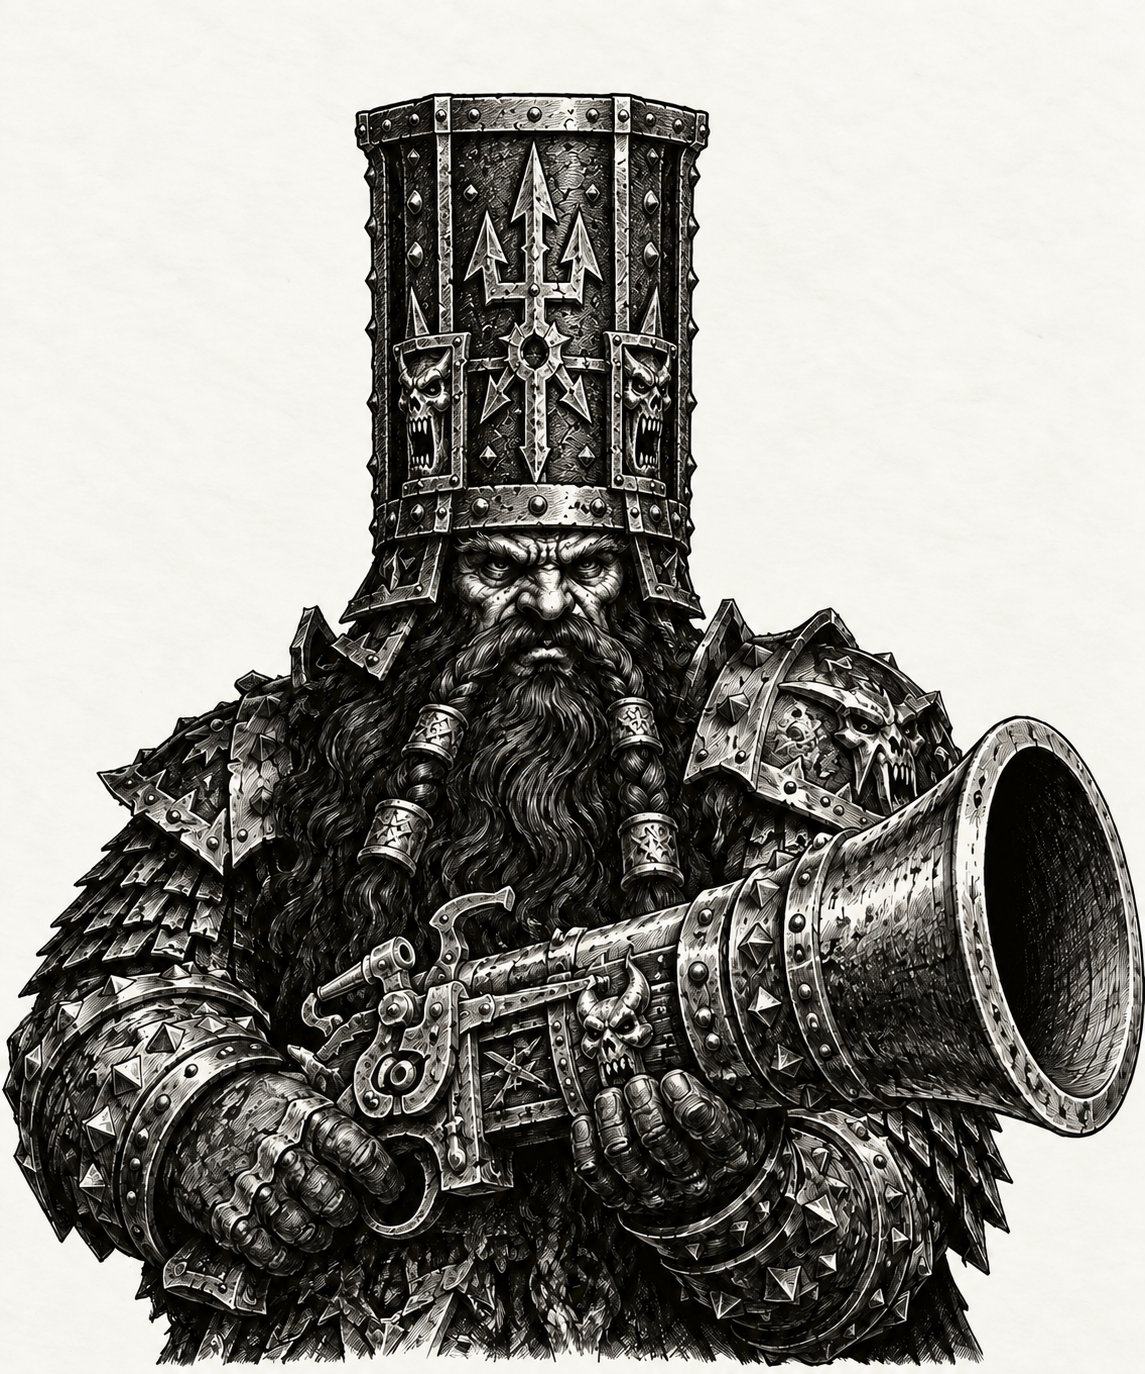
Chaos Dwarf tier list
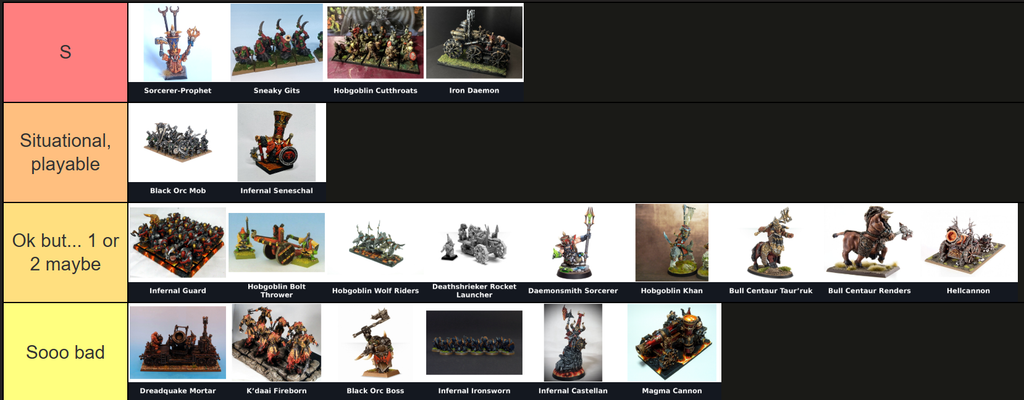
I’m describing the units in the order I remember them while recording this post on my bike, so they don’t follow the order of the tier list itself.
Sorcerer-Prophet
The Sorcerer-Prophet, our Level 3 or 4 wizard-engineer, appears in almost every Chaos Dwarf army. He costs 195 points before upgrades, but there are plenty of ways to build him.
One option is to leave him on foot. This is usually to make the most of Steed of Shadows from Demonology and send units flying towards the enemy. He will usually take a Lore Familiar as well. It’s a useful and relatively cheap build.
If the points allow it, we can also put him on a Bale Taurus. This makes him considerably tougher, and I think the extra points over the Great Taurus are worthwhile: it gives him mobility and makes him a combat threat, so he works well with spells that improve his characteristics or curse enemy units before a charge.
Another option is the Lammasu. Its Breath Weapon, combined with Elementalism, can turn it into a useful platform for casting ranged damage spells, although it isn’t as tough as the Bale Taurus build. If he is on foot, the Ruby Ring of Ruin is another interesting item, giving him access to Fireball. It can also work in some Lammasu builds.
Blackshard Armour is also worth considering. The really important part for a wizard is that it lets him cast spells while wearing armour. It also gives him a 5+ Ward save against wounds caused by attacks with Flaming Attacks. That second benefit seems quite situational to me. Flaming Attacks aren’t everywhere in the current meta, and you don’t run into Chaos Dwarfs every day either. You’d need the stars to align for both things to happen at once.
He also has Infernal Engineer: if he isn’t fleeing or fighting in combat, once per turn he can let a friendly War Machine within his Command range reroll a Scatter or Artillery die. One important clarification: the Iron Daemon is a Heavy Chariot, not a War Machine, so having a Sorcerer-Prophet nearby doesn’t let it reroll its Artillery dice.
The Iron Daemon can reroll one of its own Artillery dice through Hellbound, and it can do so only once per battle.
Daemonsmith Sorcerer
A Level 1 or 2 Daemonsmith Sorcerer is objectively worse than a Sorcerer-Prophet in terms of characteristics and has far fewer options for magic items.
If our plan is to send infantry flying with Steed of Shadows, paying for a Lore Familiar on a Level 1 or 2 wizard can feel like a poor use of points in many builds, especially if he is our only wizard.
One option is to use him simply as a support character and give him the Ruby Ring of Ruin for Fireball.
He also has Infernal Engineer, so he can let a nearby War Machine reroll an Artillery or Scatter die.
One important point: even though he is a minor character, he can ride a Great Taurus or a Lammasu (the Bale Taurus is reserved for the Sorcerer-Prophet). That lets you field several flying monsters, even if they aren’t especially tough or don’t have many Wounds.
All things considered, he doesn’t seem like the army’s worst option to me.
Hobgoblin Khan
The Hobgoblin Khan is a cheap character. Mounted on a Giant Wolf, he costs around 60 points and can act as a mobile, expendable piece that redirects enemy charges.
He has Backstab, so he can reroll failed rolls To Hit when fighting an enemy’s flank or rear. You can combine this with a magic weapon.
On paper, he can seem appealing: he’s fast, cheap, and you can even give him a magic weapon to make him a threat. The problem is that his characteristics are still quite poor. Once you start spending points to improve him, he quickly stops being the cheap character that made him worth taking.
On top of that, the rest of a Chaos Dwarf army can’t always keep up with his mobility.
He doesn’t seem like a particularly good choice to me.
Infernal Seneschal
The Infernal Seneschal is another one of our foot combat characters.
The main use I see for him is that he can become a Battle Standard Bearer, which opens up the option of taking The Lammasu’s Beard.
The banner gives the unit carrying it a 6+ Ward save against any wound and Magic Resistance (-2). Friendly units within 6 inches of the model carrying the banner also get a 5+ Ward save against wounds suffered during the Shooting phase and Magic Resistance (-1).
Is it mandatory? I don’t think so.
It can make sense in a very static infantry build, with all the units close together. The problem is the 6-inch radius: after playing it a couple of times, you realise how short it is. Also, you measure from the model carrying the Battle Standard, not from the whole unit it’s in. If he’s near the centre of a unit, he may protect the units immediately to either side, but probably not much else.
We also need to consider whether our list already has units with their own protection, and whether we really want to spend those points on a model whose job depends on keeping the army bunched up.
Personally, I’d rather have some freedom to move than constantly check whether a unit has strayed beyond those 6 inches.
In a mobile build with monsters, a Bale Taurus, a Wyvern, and other aggressive pieces, it seems even less useful. Those models are there to move and put pressure on the opponent, not to hang around a Lord with a banner for extra protection.
Infernal Castellan
The Infernal Castellan is the dwarf character focused on close combat.
There’s an important difference from what I said at first: the current Renegade list gives him access to a Bale Taurus, so he isn’t stuck moving 3 inches on foot. In fact, people are starting to field Castellans mounted on one.
But this isn’t a Renegade tier list, so the Infernal Castellan is stuck on the shelf with Movement 3.
Bull Centaur Taur’ruk
The centaur character’s usefulness depends on whether you want to take Bull Centaur Renders.
If I don’t think Bull Centaurs are good, I’m not convinced that spending more points on their character is worthwhile either. We’re talking about a model costing around 150 points in a basic build with no magic items, four Wounds, four Attacks, and Impact Hits (D3+1).
He’s practically a character riding a small chariot for the price of a big one.
Bull Centaur Renders
Bull Centaur Renders are one of those really characterful units I wish we saw more often.
They Move 7 and have Swiftstride. When you see Toughness 5 and three Wounds, you might think they’re quite durable. But the points add up quickly. Their armour save can reach 4+, but if you give them great weapons, which is how I think they should be played, they end up with a 4+ save against shooting and 5+ in combat.
And we’re talking about a unit that will cost you at least around 180 points.
If you could take them as individual models, they might make sense. Their Attacks and Impact Hits can make them look like they hit hard, but that impression is misleading. As with chariots, they need to move more than 3 inches to get those Impact Hits. The enemy can move close to them and take away that part of their damage.
I think the points you could spend on Bull Centaurs are better spent on monsters if you want hitting power, or on cheap, numerous infantry if you want staying power.
It would be great if this unit were good, because it’s so characteristic of the Chaos Dwarfs. They could also have given it a rule that created an interesting synergy with another unit.
But they didn’t. What a shame.
K’daai Fireborn
K’daai Fireborn have almost the opposite profile to Bull Centaurs.
Bull Centaurs have Toughness 5 and Strength 4; these have Strength 5 and Toughness 4. Bull Centaurs have two Attacks and three Wounds; K’daai have three Attacks and two Wounds.
Those two Wounds feel like very little on a model costing around 40 points, with no good armour and relying on its Ward save.
Don’t be fooled by their Unbreakable status: they can still disappear through combat resolution. With their profile, losing those combats is hardly impossible.
Infernal Guard
Infernal Guard are probably the infantry we see most often in Chaos Dwarf lists, though not necessarily because everyone is eager to take them.
The original Legacy composition requires at least one unit.
The good thing is that they have Strength 4. The problem is that they aren’t really a unit that hits especially hard. They have one Attack, Move 3, and if the enemy wants to avoid an expensive block of slow infantry, they often can.
One option is to give them ranged weapons and use Steed of Shadows to place them in front of the enemy and shoot. The problem is that you start making a unit that’s already expensive considerably more costly.
That’s why we often end up simply paying for shields. After playing them quite a bit, even when you’ve paid for a weapon that improves Strength and Armour Piercing, you may still prefer the protection the shield provides, to the point of wondering whether to skip the halberd altogether.
They also have Shieldwall and Stubborn. With shields, these rules make the unit much more reliable: in that first round of combat, you can feel more confident that it will hold its ground and let you set up a counter-charge.
You can also build around a regimental unit with Chaos Dwarf detachments. The problem is that it gets very expensive. You could argue that a detachment with ranged weapons can shoot when the main unit is charged, but after playing them quite a bit, the truth is that the enemy usually isn’t foolish enough to make exactly the charge you need with a unit vulnerable to those shots.
You can also take large units with ranged weapons to make the most of their rules, but the cost shoots up. I’ve hardly ever seen that, and I don’t know many people who think it’s worth it.
Infernal Ironsworn
Infernal Ironsworn are the elite combat version.
They have Weapon Skill 5, Strength 4, Toughness 4, and two Attacks. On paper, they look like serious combat infantry.
They suffer from the same problem as many elite infantry units: they’re expensive, have only one Wound, and require a huge number of points in a slow unit. They cost considerably more than Infernal Guard and, on top of that, lose the option to take ranged weapons.
It’s the perfect recipe for spending a fortune on an infantry castle the opponent can simply avoid.
Hobgoblin Cutthroats
Hobgoblin Cutthroats are typical dirt-cheap infantry. They cost three points per model (four with light armour), and that’s exactly why they can fill several roles very efficiently.
Now that objectives matter more and the game isn’t just about killing the enemy, they’ve become one of the most common units in the army.
You can take small regiments with bows, perhaps 12 or 14 models, leave them holding an objective, and use the rest of the army to keep the opponent away. They can contribute a little with their shooting while they do it.
In that kind of list, it can make sense to drop the shield. In many other builds, you’ll see them with one.
You can also use them in large blocks of 25 or 30 models to tie up much more expensive enemy units for quite a while.
That doesn’t mean they can hold up against everything. You need to understand their defensive and mobility limits: they only Move 4, and they probably won’t be our first choice for Steed of Shadows.
They are also Levies, with all the Leadership restrictions that entails, although large units can offset them to some extent with Horde and Warband.
Sneaky Gits
Sneaky Gits are a unit of skirmishing Hobgoblins that come equipped with two hand weapons and 9-inch throwing weapons.
They also have Evasive, Ambushers, Backstab, Move Through Cover, and Skirmishers.
Ambushers lets you keep them in reserve and try to bring them on from Turn 2: they arrive on a 4+, and if they keep waiting, they appear automatically on Turn 5. When they arrive, they must be more than 8 inches from any enemy unit, which makes them a threat to War Machines and other vulnerable units in the enemy’s back line.
They can’t arrive and charge straight away, but they can arrive and shoot. If they survive, they can threaten a charge on the following turn.
Their throwing weapons might seem unimpressive because of their range, but they have Ballistic Skill 4 and enough mobility to make good use of them. One of the Chaos Dwarfs’ best combos is to use Steed of Shadows to send a unit of Sneaky Gits straight into the face of a valuable target and unleash their shots.
They aren’t too expensive, so you can even afford to lose them afterwards.
Often, the opponent doesn’t expect to suddenly find a unit of Sneaky Gits in front of their wizard. And once they know about the combo, something else useful happens: they start moving more cautiously and blocking gaps to stop you placing the unit where you want.
A large unit can also threaten a later flank or rear charge. Even though they only have Strength 3, they rack up plenty of Attacks, and Backstab lets them reroll failed rolls To Hit in those situations.
Hobgoblin Wolf Riders
Hobgoblin Wolf Riders Move 9 and are cheap. They come with light armour, a shield, and a spear. Any extra rule or equipment you add after that increases their cost.
A unit of Wolf Riders costs around 60 points and does a useful job: it isn’t Core, which makes it less appealing than equivalent units, but it has enough Unit Strength to carry out some secondary tasks.
You can put it in Marching Column and cover a huge distance on Turn 1 to threaten, for example, an undefended enemy Baggage Train.
We can also use them as Skirmishers.
Whether they’re in Marching Column or skirmish formation, they’re a good unit for the kind of sacrifice you often need to make during a game: get in front of the enemy, Flee as a charge reaction, disrupt their position and set up a counter-charge, or simply make them lose time.
They can also hunt War Machines or an isolated enemy wizard who can’t defend himself in combat. The problem is that I inevitably compare them with the Orcs & Goblins Wolf Riders. These Hobgoblins do have interesting extra rules such as Evasive and Backstab, but to me there’s a world of difference between a Core unit that can fill a role in the army and another unit that has to compete for a much more contested slot.
In the end, they get left out of many lists.
Black Orc Mob
Black Orcs aren’t used as much in Orcs & Goblins because that army has plenty of other options. Chaos Dwarfs, however, don’t have as many alternatives if you want a unit that really hits hard.
That lack of options, combined with the Chaos Dwarfs’ access to magic that can buff Black Orcs and Steed of Shadows to send them forward, makes them perhaps not the most competitive unit in the world, but still a perfectly playable choice.
You can take a block of around 18, which is a build I personally like, or simply a unit of five.
The smaller unit can surprise your opponent and also unlocks certain options for a Black Orc character mounted on a Wyvern.
Black Orc Boss (Hero)
The smaller Black Orc Boss doesn’t seem particularly interesting to me.
He doesn’t hit especially hard, isn’t particularly cheap, and isn’t tough enough to stand out. Nor does he fill the usual role of controlling Impetuous units in this army.
He also can’t become a Battle Standard Bearer. That could at least have given him an interesting role by letting us bring an Orcs & Goblins banner into the Chaos Dwarf army.
But that’s not an option.
Black Orc Warboss
The Black Orc Warboss makes much more sense.
A classic build still works very well: Trollhide Trousers, Talisman of Protection or a shield, a good two-handed weapon, and a Wyvern.
He comes to around 340 points and works perfectly as an aggressive threat.
He also has Leadership 9 for using Waaagh!.
Chaos Dwarfs have an interesting advantage here: they can combine a Wyvern with a Taurus ridden by a Chaos Dwarf character, creating two very powerful monstrous threats in the same army.
Iron Daemon
The Iron Daemon is one of the army’s most worthwhile pieces. If I’m going to use Hellbound, the upgrade seems almost mandatory: it gives the model Terror, Magical Attacks, and a 6+ Ward save against wounds caused by non-magical attacks.
One important point is that the Iron Daemon is a Heavy Chariot, not a War Machine. This means Infernal Engineer doesn’t let it reroll its Artillery die.
The reroll it can get comes from Hellbound, and it can only reroll once per battle.
Carriage Hauler lets up to two friendly War Machines with the Steam Carriage upgrade move during the Movement phase when the Iron Daemon moves. To do this, at the start of the phase they must be entirely within its rear arc and within 8 inches of its base; at the end, they must still be entirely within that arc and within 8 inches. Unless the Iron Daemon uses Lumbering Destruction or makes a Charge move, the towed War Machines don’t count as having moved that turn. I think the rule is poorly designed: some of the War Machines that could benefit most from this mobility don’t work well when you try to build a list around them.
Magma Cannon
The Magma Cannon is one of the War Machines that could theoretically benefit most from the Iron Daemon.
The Magma Cannon’s main problem is its range.
The idea of using the Iron Daemon to move it closer to the enemy and get it into range seems interesting on paper. In practice, the enemy often simply doesn’t want to come closer, and even if you roll a good distance on the Artillery die, you may still fail to reach them.
Also, as I explained in my analysis of Dwarf War Machines, flame templates in this edition have a problem with partial hits.
After paying for an expensive War Machine and placing the shot correctly, you may still find that many models are only partially under the template, so you need an extra 4+ roll to hit them.
It’s hard to cover a lot of enemy bases completely with a flame template.
All of that means an already expensive War Machine has too many hurdles before it starts earning its points back.
Deathshrieker Rocket Launcher
The Deathshrieker Rocket Launcher is another fairly expensive War Machine.
I don’t think it’s as bad as the Magma Cannon, but it isn’t a magic solution either.
It has two firing modes: a stronger shot using the small template, and another using the large 5-inch template, but with Strength 3 even under the hole in the centre.
It can work against certain lists and in certain builds. It can also help cover particular matchups, so it may make more sense in a team event.
You can add Hellbound and make it even more expensive. I never would.
It has Toughness 6 and three Wounds. One bad gust of wind can take it out. In fact, enemy archers sometimes shoot at these War Machines hoping to roll a few sixes.
Besides, the current meta isn’t dominated by huge units, apart from a few deathstars.
That’s why templates, especially low-Strength templates, don’t seem particularly attractive to me right now.
Hobgoblin Bolt Thrower
The Hobgoblin Bolt Thrower has exactly the same problem as its Orcs & Goblins equivalent: basically, it will never hit. And when it finally does, it’ll fail to wound anyway. Don’t worry.
Strength 6 isn’t that impressive either.
The interesting target will usually try to stay at long range, so you may only get one good turn to shoot at it. You end up needing a 4+ or 5+ to hit, and it’s very easy for the shot to do absolutely nothing.
It’s also very easy to destroy.
It can make the enemy respect certain lines of fire, but once you start using it, you discover that it keeps missing.
It’s true that it only costs around 45 points. But after playing it a few times, you realise those 45 points—or 90 if you take two—could be spent on much more interesting units.
Hellcannon
The Hellcannon is exactly the same one found in the Warriors of Chaos army.
If you’ve seen my Warriors of Chaos tier list, where I discuss the Hellcannon and the army’s other units, you’ll already know why I don’t think it’s a good unit.
It’s anti-synergy in a nutshell.
It has Impact Hits, but only Moves 3. It doesn’t have Swiftstride. It can go crazy whenever it wants. If it moves, it can’t shoot. And on top of that, it’s quite expensive.
It shoots like a catapult with a small template and, although it has a respectable Strength of 5, we’re back to the problem of partial template hits in this edition.
I want an Unbreakable unit that can get into combat and make use of its durability. I don’t want to pay for one of the game’s most expensive defensive rules just to leave the model at the back, firing like a catapult and missing turn after turn.
And all of that costs around 200 points. Expensive and badly designed.
Dreadquake Mortar
The Dreadquake Mortar is another really characterful Chaos Dwarf unit that players are very fond of.
That affection doesn’t seem to be shared by Games Workshop.
It’s an extremely expensive War Machine that looks quite a lot like Cathay’s cannon.
It fires like a stone thrower using the large template. Normal hits are Strength 3, while the model under the central hole takes a much harder-hitting Strength 6 hit.
It also has Quake: units affected around the point of impact suffer -1 Movement and can’t use Swiftstride.
The problem is that it has huge drawbacks.
After firing, you have to check whether it can fire again next turn. Without an Ogre Loader, a roll of 1–2 stops it from shooting next turn. The Ogre Loader improves this roll so it only fails on a 1.
That’s why if you’re taking the mortar, you practically have to pay for an Ogre Loader as well.
And then the War Machine gets even more expensive.
Hellbound doesn’t make much sense here either. You end up getting dangerously close to 200 points for a War Machine that still has too many ways to fail to earn its points back.
It’s not a good War Machine, just like several of the Chaos Dwarfs’ other options.
And that’s a real shame.
We’re talking about an army known for its War Machines and its strange, highly distinctive units such as Bull Centaurs and K’daai.
Having Warhammer The Old World push you towards playing without many of those units takes away a lot of the army’s flavour and character.
Below, I’ll leave some other tier lists that I think can be useful for new players and even for those who have played more games but don’t know some of these armies and want a quick overview.
I hope you find it useful.
High Elf Tier List in Warhammer The Old World: which units are worth it WITH Characters
Warriors of Chaos Tier List. The WORST CHAOS UNITS in Warhammer The Old World
Dwarf Tier List in Warhammer The Old World: what is worth it and what is not
Chaos Dwarf Old World List: WTC 2026 World Championship Winner
Hordes of Chaos | New Army of Infamy | The March of Chaos Arcane Journal
NEW COMMON MAGIC ITEMS | Arcane Journal The March of Chaos
Any errors in the post? feel free to reach out at theoldwarrior@theoldwarrior.com.